Easy Sourdough Starter
This Easy Sourdough Starter recipe creates gorgeously fluffy homemade products such as Sourdough Baguettes. Included are simple step by step instructions on how to start, feed and Maintain Sourdough Starter that is perfect for beginners.
This post may contain affiliate links which I earn a small portion in sales if a purchase is made. Rest assured though, it is never at any additional cost to you.
What is Sourdough Starter
Very simply, sourdough starter is a fermented mixture of two ingredients, water and flour. Wild yeast found in flour flourishes when added to water and is allowed to rest in between feedings. This approach is the old fashioned way of making bread that has been done for centuries. It does require more time than active-dry or instant yeast but produces exceptional taste and textured baked goods.
Tools Needed
In addittion to the flour and water a few tools are needed to make your own from scratch Sourdough Starter.
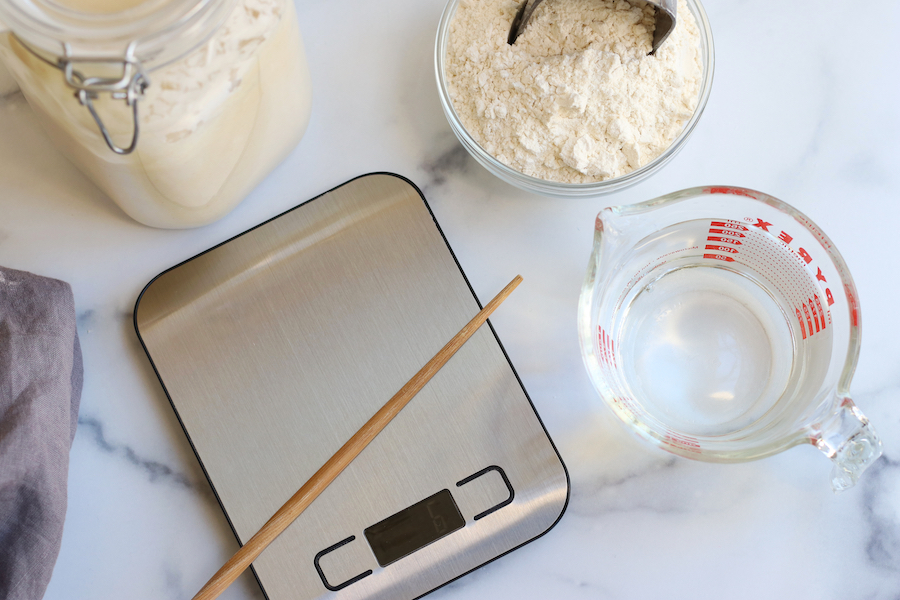
- Kitchen Scale- It is highly encouraged to use a kitchen scale to weigh the flour and water in equals parts to achieve the best results. This is the scale shown in the picture above. However, my next kitchen scale will be a little larger to accommodate the large bowl needed to make sourdough bread.
- Chopsticks– This makes stirring the starter in a glass jar much easier.
- Glass Measuring Cup– Makes for easy pouring of water.
- Scoop or Spoon– Helps with the addittion of flour.
- Medium Sized Glass Bowl– The first few days of a starters life is easier done in a medium size glass bowl.
- Plastic Wrap or Reusable Food Wraps– For the first few days of the starters life.
- Glass Jar (see below)
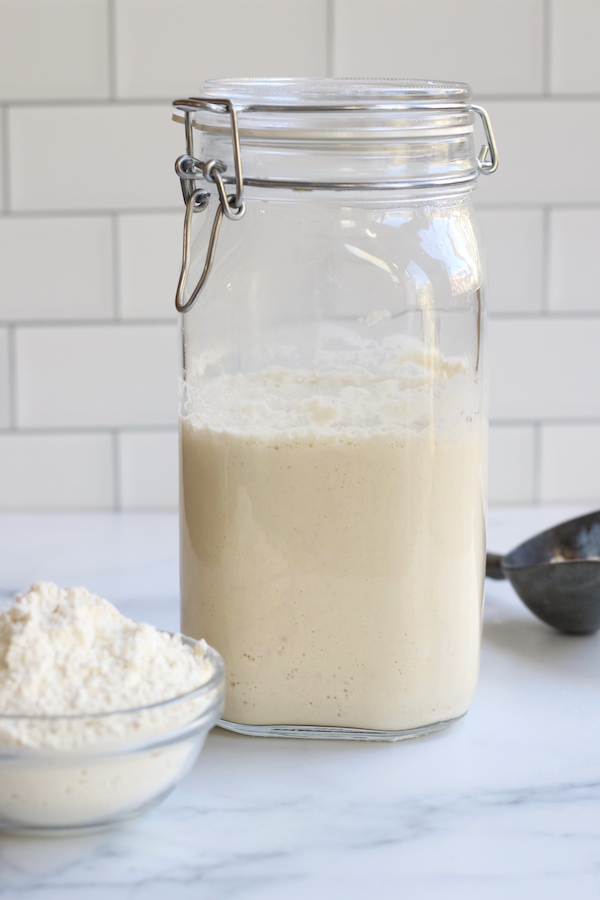
Sourdough Starter Container
The type of glass jar needed will depend on which type of flour you use to make your starter and how rapidly your starter ferments. This is the jar seen in the photo below and it works beautifully when using white all-purpose flour. Please see section directly below (White Flour vs Wheat Flour) for more explanation.
Best Flour for Sourdough Success
For the best sourdough starter, you need flour you can trust. Buying directly from King Arthur Flour means guaranteed freshness, expert-tested quality, and no risk of warehouse mishandling. Plus, you’ll find exclusive products, better stock availability, and support an employee-owned company dedicated to bakers. Skip the third-party markups and get the best right from the source. You and your sourdough deserve it! (affiliate)
White Flour vs Wheat Flour
The type of flour used will have a great influence on how your Stater ferments and the final product that you make with it. However, it is most important to not choose bleached flour as this will impede the fermentation.
All-Purpose White Flour
I adore sourdough bread that bites me back when I eat it. In other words, extra sour with a tang. However, my husband HATES that kind of bread. That is why I use all-purpose white flour for my Starter.
This type of flour yields breads that are very much like a crusty Italian loaf that he and I both go crazy for. Additionally, I use the Starter from this type of flour for making baguettes that then make incredible Homemade Breadcrumbs and croutons. The final products are never overly sour.
Wheat or Rye Flour
Wheat and rye flour has more naturally occurring wild yeast. Because of this, the starter made from these types of flours will ferment faster and with more intensity. It is very important to keep a closer eye on Starters made from these flours and to use a glass jar that has a lid that is looser or can be left slightly open. The reason for this, a tight fitting lid could be a recipe for an exploding jar.
In conclusion, wheat and rye flours will make much stronger sourdough products and all-purpose white flours (unbleached) will yield more mild final products.
How To Make
To make Sourdough Starter that is ready to bake with will take approximately 7 days, give or take a day or two. Here are the instructions for each day.
Day 1
In a medium sized glass bowl mix together 50 grams of water and 50 grams of flour. Stir well and cover. Let sit at room temperature.
Pro Tip#1– To accurately weigh the flour and water start by making sure the scale is weighing in grams vs ounces. Place the bowl on the scale and turn on. The scale should read zero with the the bowl on top. Add enough flour to equal 50 grams. Calibrate the scale back to zero again and repeat with water.
Pro Tip#2– In the making and feeding of this starter there will always be equal parts of flour and water added to it.
Day 2
To yesterday’s mixture add 50 grams of flour and 50 grams of water. Stir well and cover. Let sit at room temperature.
Day 3
Throw away half of the Starter. To the remaining Starter add 100 grams of flour and 100 grams of water. Stir well and cover. Let sit at room temperature.
Pro Tip#3– The discarded Starter from day 3- day 6 is not fully developed enough to have any uses. Simply throw it away.
Day 4
Throw away half of the starter. Add 150 grams of flour and 150 grams of water to the bowl and stir well. Cover and let sit at room temperature.
Pro Tip#4– Day 4 is the day that you will notice the mixture starting to take on the personality of a Sourdough Starter. There should be small bubbles and a slight sour smell will start to take shape.
Day 5
Similar to the previous days, throw away half of the Starter and add 150 grams of flour and 150 grams of water. Stir well, cover and let sit at room temperature.
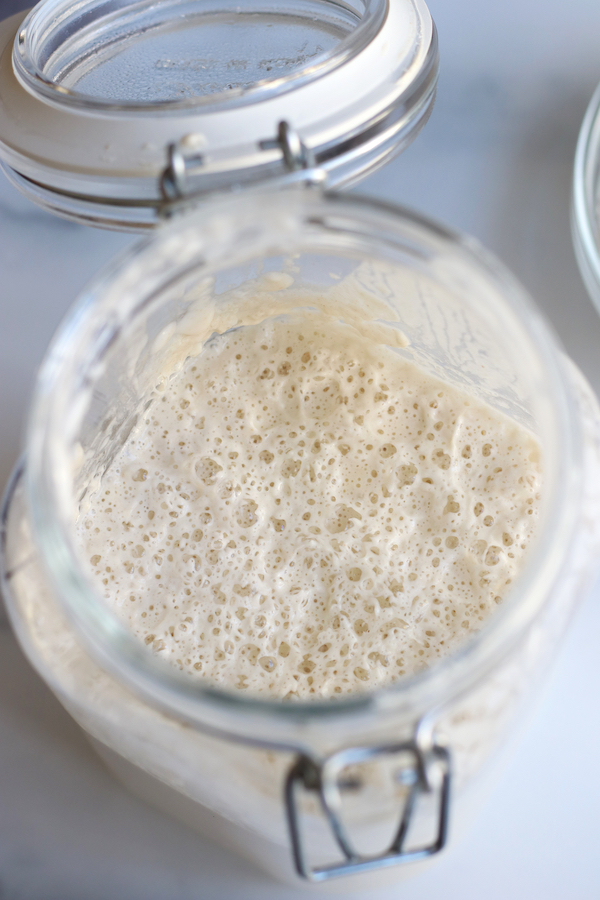
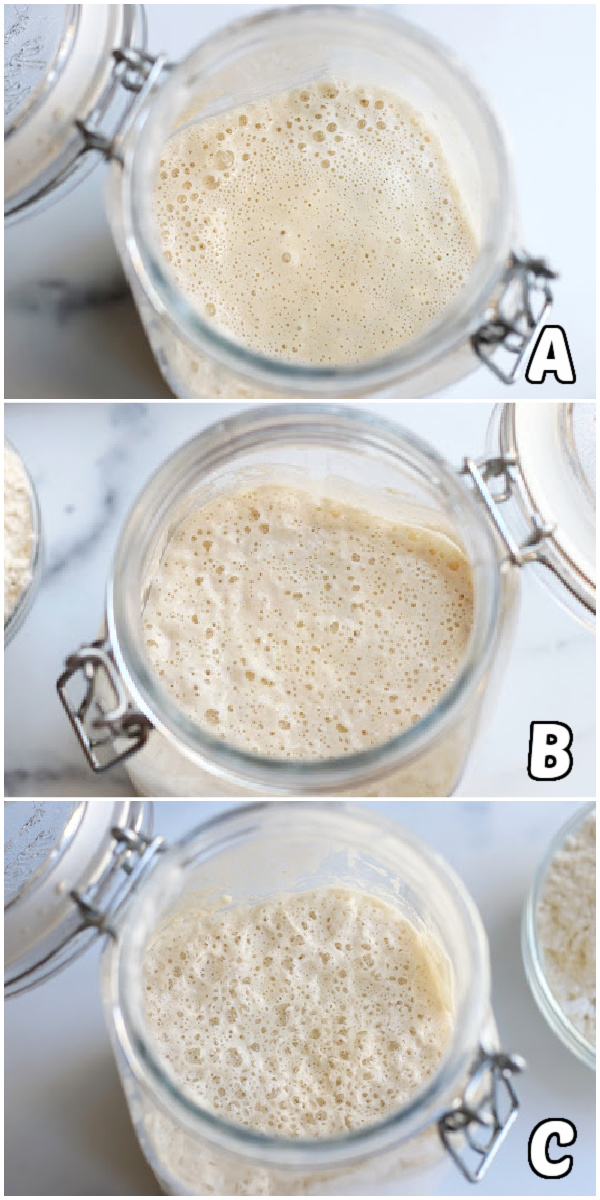
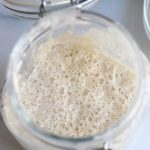
Pro Tip#5– The Starter should begin to look very similar to picture A below. If not do not worry, it will very soon. Also, feel free to transfer to the glass jar once the new flour and water its mixed in on day 5.
Day 6
Throw away half of the starter and add 200 grams of flour and 200 grams of water. Stir well, cover and let sit at room temperature.
Pro Tip#6– By day 6 the Starter should look similar to photo A below and very possibly look like photo B.
Day 7
On day 7 the Starter should at the least look like photo B if not like photo C. If it has a similar appearance to photo C, it is ready to use. If it looks like photo B, let it sit at room temperature for one additional day.
Feeding and Reviving Sourdough Starter
Above all, if your Starter looks like photo C it is ready to be used for making all kinds of sourdough products. If it looks like photo B, you can still use it for baking. However, it will slow down the rising of bread dough. When it looks like photo A, it is time to feed the Starter.
To feed the Sourdough Starter, discard half of it and add 150 grams of flour and 150 grams of water to the remaining Starter. Stir well and let sit at room temperature overnight. If on the second day the Starter has the appearance of photo B, let it sit at room temperature for one additional day before using it in recipes.
Pro Tip#7– If storing the Starter at room temperature it will need to be fed every 2-3 days. If storing in the refrigerator, it can be kept safely for up to 10 days before feeding. Please note that if storing in the refrigerator 2 feedings will most likely be needed before the Starter will look like photo C.
Starter Smell and How to Know if it has Gone Bad
A healthy Sourdough Starter is going to smell sour. Therefore, it is not the best way to judge whether it has gone bad. However, the best way to know is by its appearance. If there are any visible signs of mold or red/orange spots it is time to throw the Starter out and begin again. Take heart though, Sourdough Starters are full of good bacteria. Because of this, chances of it going bad are much lower.
Maintaining Sourdough Starter
For anyone new to sourdough baking, it is incredibly normal to have many questions and concerns about maintaining your sourdough starter. How To Maintain Sourdough Starter has a complete breakdown of the feeding schedule, common concerns and questions so that you can enjoy your sourdough starter for decades to come.
If you enjoyed this Sourdough Starter please let me know by leaving a comment and review below. Doing so helps to encourage others to make the recipe also. Thank you!
Easy Sourdough Starter
Ingredients
- 700 grams white all-purpose flour *see Note #1 below
- 700 grams filtered water
Instructions
Day 1
- In a medium sized glass bowl mix together 50 grams of water and 50 grams of flour. Stir well and cover. Let sit at room temperature.See Note #2 and Note #3 below.
Day 2
- To yesterday’s mixture add 50 grams of flour and 50 grams of water. Stir well and cover. Let sit at room temperature.
Day 3
- Throw away half of the Starter. To the remaining Starter add 100 grams of flour and 100 grams of water. Stir well and cover. Let sit at room temperature.See Note #3 below.
Day 4
- Throw away half of the starter. Add 150 grams of flour and 150 grams of water to the bowl and stir well. Cover and let sit at room temperature. See Note #4 below.
Day 5
- Similar to the previous days, throw away half of the Starter and add 150 grams of flour and 150 grams of water. Stir well, cover and let sit at room temperature. See Note #5 below.
Day 6
- Throw away half of the starter and add 200 grams of flour and 200 grams of water. Stir well, cover and let sit at room temperature. See Note #6 below.
Day 7
- On day 7 the Starter should at the least look like photo B above if not like photo C. If it has a similar appearance to photo C, it is ready to use. If it looks like photo B, let it sit at room temperature for one additional day.


Tomorrow will be my day 3 to get rid of half. I can use this as discard for discard recipes like pretzel bites, pancakes, cookies, cinnamon rolls, etc, right?? And if so, can I use that discard right away tomorrow?
On day 3, your starter is still in its early stages, so I recommend holding off on using the discard until day 7. Waiting a few more days gives your starter time to develop that signature tangy flavor and the fermentation power needed to make recipes like pretzel bites, pancakes, and cookies shine. Once it’s more mature, you’ll notice a big difference in the taste and texture of your baked goods. It’s definitely worth the wait!
How do I maintain it after day 7?
Hi Megan! For the first 6 months I recommend a fairly consistent feeding schedule depending on how often you plan to bake. For detailed instructions, check out my post on maintaining sourdough starter as it has everything you need. I hope this helps! https://www.thefedupfoodie.com/how-to-maintain-sourdough-starter/
Hi! When you say discard half of the started – are we to be measuring what the starter weighs then remove half from that or just eyeball half?
Hi Rachel! Great question! Discarding half is just eyeballing it, there’s no need to measure exactly. Sourdough is pretty forgiving at this stage, so as long as you’re removing roughly half, your starter will thrive. Don’t hesitate to reach out if you have any questions along the way.
Thanks for your easy-to-follow directions and pictures! Two questions:
(1) Once the starter process is completed after 7 days, how long before I can bake a loaf of sourdough bread? I have read conflicting info. One recipe poster said it’s not good to use for actual sourdough loafs until it has matured for 30 days. Yikes! I was ready to bake tomorrow.
(2) When maintaining starter and feeding it before using, should the amounts of starter and subsequent feeding be a 1:1:1 ratio; for example, 100g starter, 100g flour, 100g water? The recipe did not seem to maintain a 1:1:1 ratio after day 5, with the starter being a bit more grams than to water and flour ratios.
Hi Natalie! I’m so glad you found the directions and pictures helpful! Here’s what you need to know:
1) Yes, you can bake with your starter as long as it’s active, bubbly, and passes the float test (a small bit floats in water). While some bakers prefer to wait 30 days for more developed flavor, you’ll still get delicious bread now. The classic sourdough tang will just deepen as your starter matures.
2) For maintaining your starter, I recommend feeding it with equal amounts of flour and water (150g each) after discarding. This helps keep it healthy and active, even if it’s slightly more than a 1:1:1 ratio.
I hope this clears things up—happy baking!
Sorry for so many questions! (Can you tell I’m in the thick of it.) QUESTION 1: Do you ALWAYS discard 1/2 before feeding? Many baking recipes say to feed your starter before you want to bake (4-6 hours is mentioned a lot). The instructions often just say “feed”” and don’t mention discarding, so I was wondering if discarding is a given. QUESTION 2: My starter that I made from your recipe was doing great (actually I had two). Doubled on days 4-6. But by day 7, Starter A didn’t expand at all. Starter B did and went into the fridge as my backup. I took Starter B out last night, discarded and fed, and 12 hours later, nada. Little bubbling, no rise in the jar. Starter B, I discarded 1/2 and fed last night, it’s making progress but slow; only expanded about 20%. I don’t know what I am doing wrong. Or maybe I am just inpatient, but I only have so much free time to bake and I am going to miss my window this weekend.
Hi Natalie! No need to apologize, I love your enthusiasm! Here’s what I recommend:
1) Yes, you’ll always discard half before feeding. Discarding is essential to keep the starter healthy and active, so think of it as a normal part of the process. When recipes say to ‘feed’ before baking, discarding is typically implied.
2) It’s completely normal for starters to vary, especially in the early stages. Make sure you’re stirring it well before discarding to redistribute the yeast and bacteria. If progress feels slow, it could be due to temperature, water quality, or even the flour type. Try feeding every 12 hours for a day or two to boost activity. Starters are usually very forgiving so they should bounce with a few more feedings.
Hang in there, you’re doing great, and your starter will catch up soon!
what are you covering it with? a cloth over a bowl or like plastic wrap or something else?
Hi Islay! In the first few days, I loosely covered the starter with plastic wrap. Once I transferred it to a jar, I switched to a double layer of paper towels, secured with a rubber band from a broccoli bunch.
Hi!! So I’m on day 7 I haven’t fed it yet today but it’s looking a little runny. It’s not a thicker consistency..
Hi Amanda! It sounds like what you are seeing is the start of hooch, which just means your starter is hungry. Starters can sometimes take a few extra days to really get going, so don’t worry! Stick to the feeding process, and as long as you’re starting to see some bubbles and activity in the next couple days, you’re on the right track. Let me know if you have any other questions. I’m here to help!
Okay should I continue increasing the feedings or should I stay at 200 grams flour 200 grams water?
when do I transfer it to a jar?
Hi Islay! Great question! The first few days are easiest to manage in a bowl since you’re working with smaller amounts, but you can transfer it to a jar at any time. Just keep in mind that the bowl keeps things simple in the early stages. Once it’s growing and you’re feeding larger amounts, a jar is perfect for storing and monitoring your starter. I hope this helps!
Hi Islay,
I just started this morning. Love all the tips! Is it normal with 100 grams water and 100 grams white unbleached bread flour to be kinda thick, not runny all?
Hi Sherry! Congrats on getting started. Yes, it’s completely normal for the mixture to feel thicker, especially with bread flour since it absorbs more water than all-purpose. A thicker consistency actually works well for encouraging the wild yeast to grow. If it feels too thick to stir easily, you can add a tiny splash of water, but it’s not something to worry about. You’re off to a great start!
Hello I used your sourdough starter recipe and mine is thriving and rising I do have some questions on how I can keep feeding her after I bake bread without making a whole new starter and do you have any other recipes for sourdough discard I’m a new sourdough starter and have no idea what to make besides bread and also so sorry for the questions what jars should I use I’m currently using a mason jar
Hi Breanna! First off, no need to apologize. I’m here to help, and I love all your questions! It sounds like your starter is thriving, which is so exciting. After you bake bread, you can absolutely keep feeding your starter without starting fresh. I actually have a whole post on maintaining your sourdough starter that I think will be really helpful. https://www.thefedupfoodie.com/how-to-maintain-sourdough-starter/
As for discard, I don’t have recipes posted yet, but I do recommend waiting until your starter is more mature before using the non bubbly discard in recipes. Once it’s ready, there’s so much you can do beyond bread! I have a Sourdough Cloverleaf Rolls recipe coming soon, and I’ll be sharing more ideas over time, so stay tuned. Oh, and mason jars are great for starters! Just make sure there’s enough room for it to grow. I do have the larger jar that I use linked within this recipe. You’re doing an amazing job! Keep at it, and don’t hesitate to ask more questions!
Hi,
Just wondering, I started my starter 2 days ago. Today is supposed to be my third day, i found too many bubbles and there’s water. It’s less than 24hrs from the last feed, is it alright that I do the 3rd day procedure? Or should i feed it twice today?
Thank you
Hi Rachylle! It sounds like your starter is right on track, lots of bubbles and even some liquid (called hooch) early on are completely normal! Hooch is just a sign that the wild yeast is active and hungry, but there’s no need to feed it twice. Simply stir it back in and continue with your Day 3 feeding as planned. Your starter is off to a great start, excited for you!
Hi!
I started this process on Monday. So today is day 4. Everything was going well, it was doubling, but this morning, my starter has not increased at all and there’s some liquid on the top. Not sure how to continue now.
Hi Logan! You are actually right on track. Around days 3-5, many sourdough starters hit a bit of a slowdown. The liquid on top, called hooch, just means that it’s hungry. It’s nothing to worry about. Just stir it back in and proceed with the discard and feeding.
This happens because, in the first few days, a mix of bacteria and wild yeast start to wake up and multiply. Early on, some of the more aggressive bacteria can cause a big rise, but as the balance shifts and the yeasts settle in, things may slow down for a bit. It’s just part of the process! Keep feeding it consistently, and before long, the yeast will get stronger and more active again.
I would love to know how it looks in the next day or two!
I’ve been feeding my starter daily for over two weeks and it doesn’t seem to get past picture A. What am I doing wrong?
Hi Kacie! Thank you so much for reaching out. I can imagine how frustrating this must be. Let’s see if we can problem solve together. I would first look to the type of water being used. Tap water can have chlorine or other chemicals that slow down fermentation, so switching to filtered or dechlorinated water can really help. Also, make sure you’re using unbleached flour. Unfortunately, bleached flour is treated with chemicals that can reduce enzyme activity and the natural microbial populations needed for fermentation. This limits the nutrients available to your starter, slowing down its growth. You may find my post about how to maintain sourdough starter helpful because it digs deeper with problem solving. Please don’t hesitate to reach out with any questions and I hope you’ll be baking soon. https://www.thefedupfoodie.com/how-to-maintain-sourdough-starter/
My starter is very thick, stuck to the spoon. It’s day 4 and there are some bubbles but it is difficult to stir. I’ve weighed everything. Maybe my calculations are off? Can I save this?
Hi Mary! yes, you absolutely can save it. This happens sometimes, even with careful weighing. Factors like flour type or room temperature can make your starter thicker than expected. Try adding a bit more water, a tablespoon at a time, until it loosens up slightly and keep up with the discard and feeding. It sounds like you are right on track and will be baking soon. Happy baking!
Hello, I’ve made sour dough starters back in the 90s but not since. How much of this starter do you use to make bread, and do you have a recipe for bread that I could use? Thanks
Hi Monica! That’s wonderful that you’re getting back into sourdough! Once your starter is active and bubbly, most sourdough bread recipes use about 50-100g of starter per loaf, though it can vary depending on hydration and method.
I do have a great Soft Sourdough Bread recipe that’s beginner-friendly and perfect for making a fluffy, tender loaf. You can find it here: https://www.thefedupfoodie.com/soft-sourdough-bread/
You many also enjoy the other sourdough recipes I have under my sourdough section with more coming soon: https://www.thefedupfoodie.com/category/meal/breads/sourdough/
Hi,
Today is my 8th day and I don’t see any bubbles like in photo B or C but there’s a little bit of hooch on the top. I’m not sure what happened. Maybe I threw more than half of the previous mixture, will it affect the end product?
Thank you 😊
Hi Rachylle! It sounds like your starter just needs a little more time to build strength, which is totally normal at this stage. The small amount of hooch means it’s hungry, so I’d recommend continuing with daily feedings for a few more days.
If you accidentally discarded more than half, it’s not a big deal, it won’t ruin your starter. Just keep feeding as usual, and it will bounce back. If your kitchen is on the cooler side, placing the starter in a slightly warmer spot (around 75°F) can also help encourage activity.
Keep going, and you’ll start seeing those bubbles soon!
Hi!
By day 7 my starter looked just like photo C, but it has never doubled in size. It has risen a small amount but never came close to doubling. Is that something that will happen overtime as I keep with this feeding schedule or should I switch to twice a day feeds?
Thank you!
Hi Bridget! You’re right on track! A brand-new starter often behaves just like yours, rising a little but not quite doubling. This is completely normal. As your starter matures over the coming weeks, it will gain more strength, rise higher, and become more predictable.
My current starter is over five years old, and while it doubles like crazy now, in the early days, it looked just like what you’re describing. Keep up with your feeding schedule, and with time, you’ll see it develop into a robust, reliable starter.
You’re doing great and happy baking!
Just want to say, this is my first starter I’ve made past day 4 lol woo! I also have three starters going for my two girls & I to make bread..but I do have some questions!
I’m using einkorn flour as I’m gluten sensitive & heard this is easier to digest.. but I’m noticing all three starters are very runny in texture. They definitely bubble up but the last two days there’s a layer of pinkish liquid on top.. is that normal? Doesn’t smell rotten, no mold or weird spots.
I’m also noticing when I feed, the flour is so lumpy, I feel like I’m stirring it forever to get every single lump big & small out & I’m afraid I’m over-stirring it.. do I need to make sure every single lump is gone before I let it sit?
Also, just want to make sure, you’re supposed to mix the liquid back into the starter before I add the flour & water? I hope I’m doing everything ok!
I also keep it in a dark cupboard with my dishes, should I not? I’m afraid my kids will play with it if I leave it on the counter lol
Lastly, what size jar do you normally keep it in? The jar I’m using is already too small after todays feed & I’ll need to move it into a bigger jar tomorrow lol
Thank you for this page!!! I’m so excited for this new chapter of life!
Hi Harmony! That’s amazing! Getting past day 4 is a huge milestone! And how fun that you and your girls are all making starters together. You’re doing great!
Einkorn flour behaves a bit differently than regular wheat flours, and while I don’t personally bake with it often, I do know it tends to create a runnier texture because it absorbs less water. The pinkish liquid on top sounds like hooch, which is totally normal when a starter is hungry. Just stir it back in before feeding as you’ve been doing!
For the lumps, no need to stress over getting every single one out. A few small lumps will break down as the starter ferments, so just stir until it’s mostly incorporated and don’t worry about overmixing.
Keeping it in a dark cupboard is fine as long as there’s some airflow and it’s not too cold. If you ever notice it getting sluggish, a slightly warmer spot (around 75°F) can help. As for the jars, I have linked within the post the one I use and adore.
You’re on the right track, and I love your excitement for this journey! Let me know if you have any other questions. Happy baking!
Hi. Should I keep feeding the starter with 200g flour and 200g water once a day? Until it develops like in photo C?
Thank you 😊
Hi Rachelle! Great question! If your starter isn’t quite as bubbly and active as in photo C, keep feeding it 200g of both flour and water once a day. Once it reaches that level of development, you can transition to feeding it 150g of both water and flour going forward. Hope that helps!