Easy Sourdough Starter
This Easy Sourdough Starter recipe creates gorgeously fluffy homemade products such as Sourdough Baguettes. Included are simple step by step instructions on how to start, feed and Maintain Sourdough Starter that is perfect for beginners.
This post may contain affiliate links which I earn a small portion in sales if a purchase is made. Rest assured though, it is never at any additional cost to you.
What is Sourdough Starter
Very simply, sourdough starter is a fermented mixture of two ingredients, water and flour. Wild yeast found in flour flourishes when added to water and is allowed to rest in between feedings. This approach is the old fashioned way of making bread that has been done for centuries. It does require more time than active-dry or instant yeast but produces exceptional taste and textured baked goods.
Tools Needed
In addittion to the flour and water a few tools are needed to make your own from scratch Sourdough Starter.
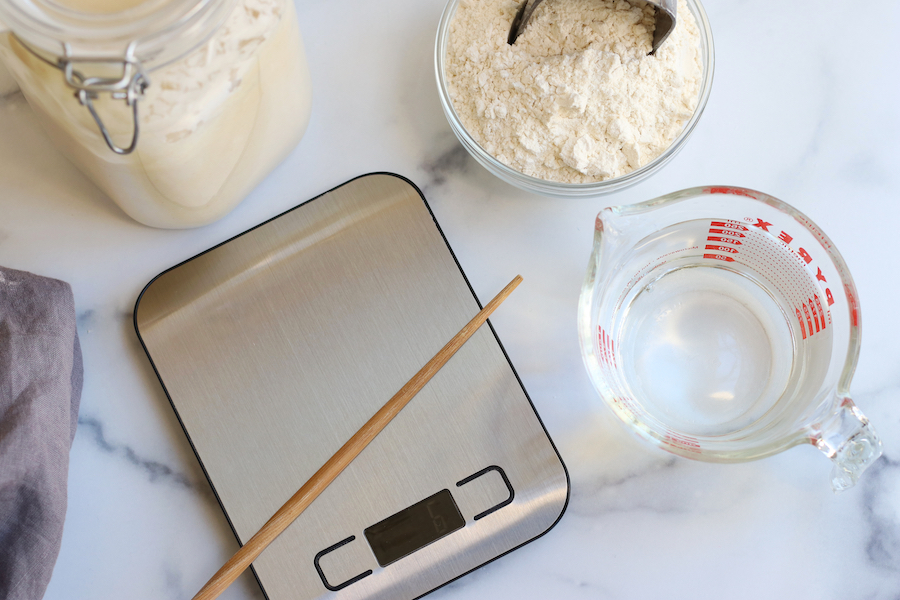
- Kitchen Scale- It is highly encouraged to use a kitchen scale to weigh the flour and water in equals parts to achieve the best results. This is the scale shown in the picture above. However, my next kitchen scale will be a little larger to accommodate the large bowl needed to make sourdough bread.
- Chopsticks– This makes stirring the starter in a glass jar much easier.
- Glass Measuring Cup– Makes for easy pouring of water.
- Scoop or Spoon– Helps with the addittion of flour.
- Medium Sized Glass Bowl– The first few days of a starters life is easier done in a medium size glass bowl.
- Plastic Wrap or Reusable Food Wraps– For the first few days of the starters life.
- Glass Jar (see below)
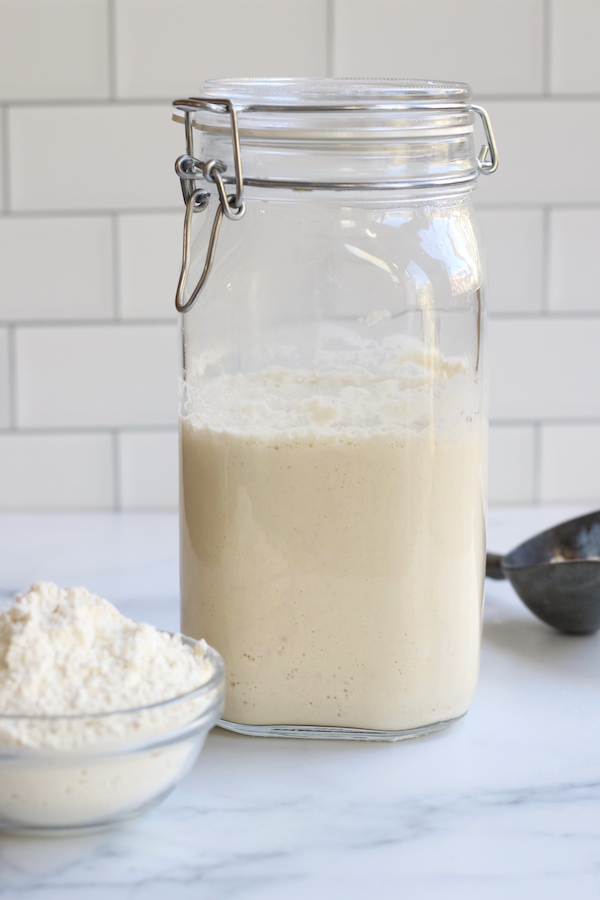
Sourdough Starter Container
The type of glass jar needed will depend on which type of flour you use to make your starter and how rapidly your starter ferments. This is the jar seen in the photo below and it works beautifully when using white all-purpose flour. Please see section directly below (White Flour vs Wheat Flour) for more explanation.
Best Flour for Sourdough Success
For the best sourdough starter, you need flour you can trust. Buying directly from King Arthur Flour means guaranteed freshness, expert-tested quality, and no risk of warehouse mishandling. Plus, you’ll find exclusive products, better stock availability, and support an employee-owned company dedicated to bakers. Skip the third-party markups and get the best right from the source. You and your sourdough deserve it! (affiliate)
White Flour vs Wheat Flour
The type of flour used will have a great influence on how your Stater ferments and the final product that you make with it. However, it is most important to not choose bleached flour as this will impede the fermentation.
All-Purpose White Flour
I adore sourdough bread that bites me back when I eat it. In other words, extra sour with a tang. However, my husband HATES that kind of bread. That is why I use all-purpose white flour for my Starter.
This type of flour yields breads that are very much like a crusty Italian loaf that he and I both go crazy for. Additionally, I use the Starter from this type of flour for making baguettes that then make incredible Homemade Breadcrumbs and croutons. The final products are never overly sour.
Wheat or Rye Flour
Wheat and rye flour has more naturally occurring wild yeast. Because of this, the starter made from these types of flours will ferment faster and with more intensity. It is very important to keep a closer eye on Starters made from these flours and to use a glass jar that has a lid that is looser or can be left slightly open. The reason for this, a tight fitting lid could be a recipe for an exploding jar.
In conclusion, wheat and rye flours will make much stronger sourdough products and all-purpose white flours (unbleached) will yield more mild final products.
How To Make
To make Sourdough Starter that is ready to bake with will take approximately 7 days, give or take a day or two. Here are the instructions for each day.
Day 1
In a medium sized glass bowl mix together 50 grams of water and 50 grams of flour. Stir well and cover. Let sit at room temperature.
Pro Tip#1– To accurately weigh the flour and water start by making sure the scale is weighing in grams vs ounces. Place the bowl on the scale and turn on. The scale should read zero with the the bowl on top. Add enough flour to equal 50 grams. Calibrate the scale back to zero again and repeat with water.
Pro Tip#2– In the making and feeding of this starter there will always be equal parts of flour and water added to it.
Day 2
To yesterday’s mixture add 50 grams of flour and 50 grams of water. Stir well and cover. Let sit at room temperature.
Day 3
Throw away half of the Starter. To the remaining Starter add 100 grams of flour and 100 grams of water. Stir well and cover. Let sit at room temperature.
Pro Tip#3– The discarded Starter from day 3- day 6 is not fully developed enough to have any uses. Simply throw it away.
Day 4
Throw away half of the starter. Add 150 grams of flour and 150 grams of water to the bowl and stir well. Cover and let sit at room temperature.
Pro Tip#4– Day 4 is the day that you will notice the mixture starting to take on the personality of a Sourdough Starter. There should be small bubbles and a slight sour smell will start to take shape.
Day 5
Similar to the previous days, throw away half of the Starter and add 150 grams of flour and 150 grams of water. Stir well, cover and let sit at room temperature.
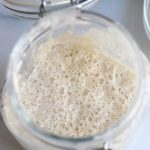
Pro Tip#5– The Starter should begin to look very similar to picture A below. If not do not worry, it will very soon. Also, feel free to transfer to the glass jar once the new flour and water its mixed in on day 5.
Day 6
Throw away half of the starter and add 200 grams of flour and 200 grams of water. Stir well, cover and let sit at room temperature.
Pro Tip#6– By day 6 the Starter should look similar to photo A below and very possibly look like photo B.
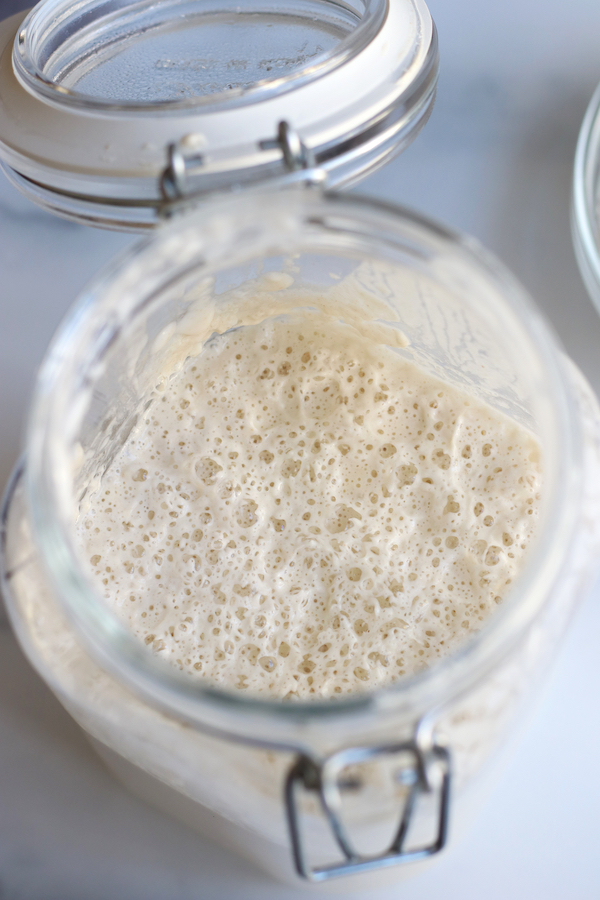
Day 7
On day 7 the Starter should at the least look like photo B if not like photo C. If it has a similar appearance to photo C, it is ready to use. If it looks like photo B, let it sit at room temperature for one additional day.
Feeding and Reviving Sourdough Starter
Above all, if your Starter looks like photo C it is ready to be used for making all kinds of sourdough products. If it looks like photo B, you can still use it for baking. However, it will slow down the rising of bread dough. When it looks like photo A, it is time to feed the Starter.
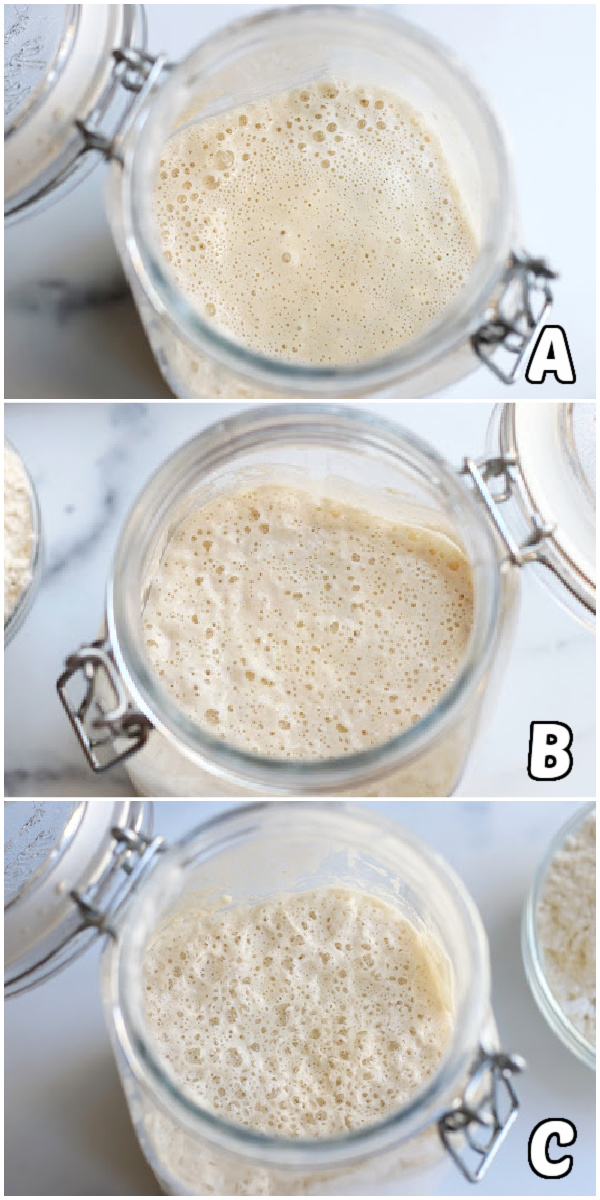
To feed the Sourdough Starter, discard half of it and add 150 grams of flour and 150 grams of water to the remaining Starter. Stir well and let sit at room temperature overnight. If on the second day the Starter has the appearance of photo B, let it sit at room temperature for one additional day before using it in recipes.
Pro Tip#7– If storing the Starter at room temperature it will need to be fed every 2-3 days. If storing in the refrigerator, it can be kept safely for up to 10 days before feeding. Please note that if storing in the refrigerator 2 feedings will most likely be needed before the Starter will look like photo C.
Starter Smell and How to Know if it has Gone Bad
A healthy Sourdough Starter is going to smell sour. Therefore, it is not the best way to judge whether it has gone bad. However, the best way to know is by its appearance. If there are any visible signs of mold or red/orange spots it is time to throw the Starter out and begin again. Take heart though, Sourdough Starters are full of good bacteria. Because of this, chances of it going bad are much lower.
Maintaining Sourdough Starter
For anyone new to sourdough baking, it is incredibly normal to have many questions and concerns about maintaining your sourdough starter. How To Maintain Sourdough Starter has a complete breakdown of the feeding schedule, common concerns and questions so that you can enjoy your sourdough starter for decades to come.
If you enjoyed this Sourdough Starter please let me know by leaving a comment and review below. Doing so helps to encourage others to make the recipe also. Thank you!
Easy Sourdough Starter
Ingredients
- 700 grams white all-purpose flour *see Note #1 below
- 700 grams filtered water
Instructions
Day 1
- In a medium sized glass bowl mix together 50 grams of water and 50 grams of flour. Stir well and cover. Let sit at room temperature.See Note #2 and Note #3 below.
Day 2
- To yesterday’s mixture add 50 grams of flour and 50 grams of water. Stir well and cover. Let sit at room temperature.
Day 3
- Throw away half of the Starter. To the remaining Starter add 100 grams of flour and 100 grams of water. Stir well and cover. Let sit at room temperature.See Note #3 below.
Day 4
- Throw away half of the starter. Add 150 grams of flour and 150 grams of water to the bowl and stir well. Cover and let sit at room temperature. See Note #4 below.
Day 5
- Similar to the previous days, throw away half of the Starter and add 150 grams of flour and 150 grams of water. Stir well, cover and let sit at room temperature. See Note #5 below.
Day 6
- Throw away half of the starter and add 200 grams of flour and 200 grams of water. Stir well, cover and let sit at room temperature. See Note #6 below.
Day 7
- On day 7 the Starter should at the least look like photo B above if not like photo C. If it has a similar appearance to photo C, it is ready to use. If it looks like photo B, let it sit at room temperature for one additional day.


Hi! My starter is looking great. I just transferred it to a glass jar. Do I seal the lid? Give it air? What’s best?
Hi Susan. I am so happy to hear your starting is looking great.
When I’m feeding the starter daily, I typically cover it with two layers of paper towels secured with a rubber band, often repurposed from broccoli or asparagus bunches. This method prevents the starter from outgrowing its container, avoiding any potential messes or breaking the glass jar. For periods when I’m not actively feeding it for bread-making, I simply use the glass lid to cover it.
I hope this helps. I also have a post all about maintaining sourdough starter that may be helpful. https://www.thefedupfoodie.com/how-to-maintain-sourdough-starter/
Happy Baking !
On the days that we discard half of the starter, can we simply use that to add the flour & water to like the batch we keep? This way we have several starters to share?
Yes, you absolutely can use the discarded starter to begin a new starter to share with family and friends. Just keep in mind that if done frequently, you may find yourself with more starters than you can manage. However, it’s a great way to share the joy of sourdough baking.
I wish I had found this article sooner. I was given a starter on Saturday and told to feed it. So three times this week I pulled it out of the fridge and added equal parts flour and water. I did not even know not to use bleached flour till I feed it today. Have I ruined it? Should I be discarding and if so bake or not bake? Any help would be appreciated! Thanks!
Hi Alisha. Thank you for reaching out! Don’t worry, your starter should be fine. While unbleached flour is generally recommended because it contains more natural yeast and bacteria, using bleached flour a few times typically won’t ruin your starter. Just switch to unbleached flour from now on. You can continue feeding it and it should recover. As for discarding, it’s part of the feeding process to manage the starter’s size and concentration, so you can definitely use the discard in recipes! Feel free to bake with it. If you have any more questions, I’m here to help!
Thank you!
You are very welcome!
then how do you make the bread.
Hi Margarita. Here are a few breads recipes. Also, my soft sourdough recipe will be available soon. https://www.thefedupfoodie.com/sourdough-french-bread/
https://www.thefedupfoodie.com/sourdough-baguettes/
Hello Heather, I am using your recipe. When I was in the first couple days it appeared I had a lot more action. After the large increases the bubbles have decreased. Is this normal? I’m on day seven but will not feed until this evening. A couple days ago my starter was too liquidy so I backed off some water. What do you think? I wish I could send you a picture
Hi Kathleen. I am so sorry I wasn’t able to respond yesterday. What you are experiencing is completely normal and backing off of the water was a wise approach.
During the first few days, the initial burst of activity is usually due to the presence of easy-to-consume sugars and a variety of wild yeasts and bacteria. As the environment in the starter becomes more acidic and these initial food sources are consumed, the activity might decrease. This often referred to as the lag phase and it is a normal part of the process. The best approach is to continue regular feedings, and the starter should stabilize and become active again.
I hope this helps. Please don’t hesitate to reach out with any other questions or concerns. Also, this post about maintaining your starter may be helpful. https://www.thefedupfoodie.com/how-to-maintain-sourdough-starter/
Happy Sourdough Baking!
Heather, Hi! I am totally new to sour dough. I want to try your recipe but I am a bit confused by the measurements. 50g flour and 50g water. should it be ml instead of grams for the water? thank you for your help
Hi Patricia. Welcome to sourdough baking! I’m thrilled you’re interested in trying my recipe. To clarify, the measurements are correct: 50 grams of flour and 50 grams of water. Using grams for both ingredients ensures accuracy, as weight measurements are more precise than volume measurements.
Water measured in grams is exactly what we need for consistency in sourdough. If you use a kitchen scale, it will give you the best results.
If you have any more questions, please feel free to ask. Happy baking!
Thank you Heather! I will keep you posted on how the starter goes. excited to get going 😃
Heather, hi I have another question. when can I use the discard? I found a discard tortilla recipe I would like to try. 5/27 will be day 4. feed time is 8:45-9:00pm.
I accidentally grabbed unbleached bread flour instead of all-purpose will that still work?
Hi Megan. Yes, using unbleached bread flour instead of all-purpose flour for your sourdough starter will still work. The higher protein content in bread flour can actually help your starter become more active. If the starter seems thicker, just add a little more water to get the right consistency. Moving forward, you might prefer using all-purpose flour as it provides a good balance of protein, which you may find easier to manage over bread flour. Overall, your starter should be fine and might even get a boost from the bread flour!
Hi, so u started my starter and today is day 7 but like the above poster, I feel like it was more active in the first couple days than it is now. I don’t even know if it would considered to look like A. Do I let it sit another day or do another feed and discard? Thanks
Hi Cat. It’s not uncommon for the starter to be more active in the first few days and then slow down a bit. This can be part of the natural process as the wild yeasts and bacteria establish themselves.
If your starter isn’t looking as bubbly or active right now, I recommend giving it another discard and feed. It may take up to 2-3 more days of this routine before it’s ready to make bread. Two more tips: keep your starter in a warm location, as this can boost its activity. Also, you might find this post helpful. https://www.thefedupfoodie.com/how-to-maintain-sourdough-starter/
Let me know how it goes, and feel free to ask if you have any more questions!
Happy Baking!
Hello newbie here. I am following your recipe and I have a question. On day three and beyond when we are adding in 100g or more of flour and water do we use the same weight of starter too. So it would be 1:1:1? The reason I ask is because if I weigh my starter at half of what it was It could weigh 200g or more due to doubling in size.
Hi Eve. Great question!
As for the weight of the starter, it can be tricky to determine precisely since you would need to subtract the weight of your container each time. It’s much easier to simply eyeball the amount when discarding half. Don’t worry about the exact weight of the remaining starter; it doesn’t have to be perfect. The natural yeast will be sufficient to handle the feeding.
However, it’s important to be consistent with the weight of the flour and water you add. This consistency will help you achieve reliable results.
I hope this helps to streamline the process. Please don’t hesitate to reach out with any other questions. Happy baking!
Sorry if you said it, but do I need to repeat the process around the same time each day? I started today at 3 PM, so should I continue around this time each day, or does it really matter? This is my first time and I’m excited!
Hi Lana. No problem at all, I’m happy to help. It’s great to hear you’re excited about making your first sourdough starter!
Yes, it’s generally a good idea to feed your starter around the same time each day but it’s not a huge deal if you are a few hours off. Basically, if you started in the morning you would want to try and continue within the morning hours.
Please feel free to reach out if you have any more questions.
Happy Baking!
Hi Heather,
My starter overflowed today. It’s first sourdough starter recipe that has worked for me.
I am trying to make sourdough bread. In the recipe it says to proof the bread for 7-10 hrs which I did but my dough is still underproof. Is there something I need to do with starter in future?
Please help
Hi Swati. I am so excited to hear about how healthy your starter is! I did include a link for a larger jar within the post if needed.
As far as the time needed to proof the dough (aka the first fermentation), it is not uncommon for the dough to take longer on the first rise due to factors such as the temperature of your kitchen. However, if you are concerned that there may be something off with the dough, it’s always good to troubleshoot a bit. Here are a few things to consider:
Stretch and Folds: Ensure all the stretch and folds were done as specified.
Starter Strength: Make sure the starter was at its peak strength when added to the dough.
Flour Type: Check if unbleached flour is being used.
Just keep in mind that each sourdough has its own personality, and yours may need just a bit more time for fermentation.
Happy baking!
Thank you for your reply.
After the proofing time the dough was very sticky I couldn’t handle it to turn it into a ball. And bread came out very dense.
Any suggestions for this ? Do you have any post on underproofing overproofing the dough. How to handle sticky sourdough ?
Thank you
Hi, first starter here! I’m on day 4 and mine is already looking like picture C. Do I keep feeding it to day 7? It’s very bubbly and slight sour smell.
Hi Carly. This is a great question, and I’m thrilled to hear your starter is doing so well! I recommend continuing the discard and feeding process until day 7 to ensure your starter is fully developed. Sometimes, starters experience “false fermentation,” where they show early activity that may decrease over time. If by day 7 your starter doubles in size a few hours after feeding, it’s ready to use for baking. If it’s not as active by then, simply keep discarding and feeding for a few more days. Please keep me updated as I would love to hear how it goes.
Got it!! Thank you!!!
Hello! New to sour dough baking and I have looked at many recipes for the starters. My question is why do other recipes call for feeding and dumping 2x a day towards end of week and yours is only 1 time for the whole week? I like the idea of only feeding and dumping just once a day but curious about the difference.
Hi Liz. Welcome to sourdough baking! Great question. The frequency of feeding and discarding can vary depending on the recipe and the desired fermentation activity. Feeding and dumping twice a day towards the end of the week can accelerate the fermentation process, making the starter more active quickly. My method, which involves feeding and discarding once a day, is designed to be simpler and less time-consuming while still building a strong and healthy starter. It’s a bit more gradual but effective. Feel free to experiment and find what works best for you!
Hi, I have some questions that you might be able to help me with. My starter is almost a month old and thriving but after feeding it, it weighs about 800 grams. After discard it’s about 400 and then I feed it 200 grams of flour and 200 grams of water. Is it possible to reduce the starter to 200 or just make it smaller, I feel like I’m wasting a lot of flour. If I reduce it to 200 after discard, how many grams of flour and water should I feed it with? Also is it true if I want to put my starter in the fridge that I need to wait a couple months for it to mature more before I put it to sleep? Thanks
Hi Catherine. These are great questions and I am happy to help. Yes, you can definitely reduce the size of your starter to minimize waste. If you want to reduce your starter to 200 grams after discard, you can feed it with 100 grams of flour and 100 grams of water. This will keep the same 1:1:1 ratio (starter:flour:water) that you’re currently using.
Regarding storing your starter in the fridge, you don’t need to wait a couple of months. As long as your starter is active and bubbly, you can put it in the fridge now. Just make sure to feed it well before refrigerating it. When you’re ready to use it again, take it out, let it come to room temperature, and give it a couple of feedings to reactivate it. However, I often recommend keeping up with feedings for a few months before letting the starter rest, just to ensure that it is fully mature. It really boils down to how well the starter is doing. It sounds like yours is thriving, so I think you’re good to go!
I hope this helps! Let me know if you have any more questions.
Hello! This is my second attempt at trying to make my own sourdough starter. However, for both attempts on day 2-3 it doubles in size and looks like pictures B and C which I believe is a false rise. The issue is, after it rises it doesn’t fall even if I leave it and let it do its thing it’s still doubled in size and super bubbly. Correct me if I’m wrong but from what I have researched it shouldn’t be fed until it so I’m not sure what to do.
Hi Makenna. I appreciate you sharing your experience. The rise on days 2-3 can be very normal and is a good sign of yeast activity. Because every starter has a different personality due to various factors such as the type of water and flour used, it’s not uncommon for the starter to stay bubbly and doubled for a while. I recommend simply proceeding with the discard and feeding process the following day. Also, I highly recommend continuing the process for the full 7 days to ensure your starter is healthy and vibrant. In short, don’t worry if it hasn’t fallen on day 2 or 3. It doesn’t mean that you’ve done anything wrong or that your starter isn’t doing well.
My starter looked a little too liquidy for a few days. So here I am day 9, I fed yesterday, covered and let sit on counter. It is very bubbly, tripled in size and made a mess everywhere on counter. Does this mean I can start keeping discard and start baking with the starter?
Hi Taylor. Yes, it sounds like your stater is ready to go and will make some beautiful bread. Also, I wrote a post about maintaining the starter over the long haul that may be helpful. https://www.thefedupfoodie.com/how-to-maintain-sourdough-starter/
Happy baking!
First time trying to make a sourdough starter. it’s my first night getting it going. I followed your directions except I used bread flour. I did the equal parts and the results seem kind of thick. should it be thick or be more liquid looking.
Hi Wendy. I am excited for you. Welcome to the adventures of sourdough baking. As far as using bread flour, it can make the starter thicker, but it should work fine. Once the stater is deeper in the process, you can always add a few more grams of water to achieve a less thick consistency. Please don’t hesitate to reach out with anymore questions and happy baking!