Easy Sourdough Starter
This Easy Sourdough Starter recipe creates gorgeously fluffy homemade products such as Sourdough Baguettes. Included are simple step by step instructions on how to start, feed and Maintain Sourdough Starter that is perfect for beginners.
This post may contain affiliate links which I earn a small portion in sales if a purchase is made. Rest assured though, it is never at any additional cost to you.
What is Sourdough Starter
Very simply, sourdough starter is a fermented mixture of two ingredients, water and flour. Wild yeast found in flour flourishes when added to water and is allowed to rest in between feedings. This approach is the old fashioned way of making bread that has been done for centuries. It does require more time than active-dry or instant yeast but produces exceptional taste and textured baked goods.
Tools Needed
In addittion to the flour and water a few tools are needed to make your own from scratch Sourdough Starter.
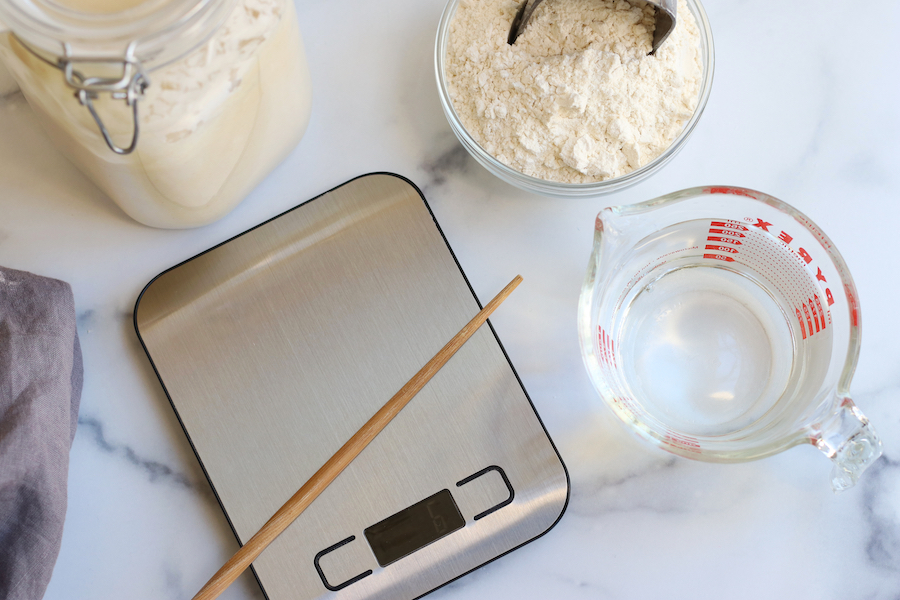
- Kitchen Scale- It is highly encouraged to use a kitchen scale to weigh the flour and water in equals parts to achieve the best results. This is the scale shown in the picture above. However, my next kitchen scale will be a little larger to accommodate the large bowl needed to make sourdough bread.
- Chopsticks– This makes stirring the starter in a glass jar much easier.
- Glass Measuring Cup– Makes for easy pouring of water.
- Scoop or Spoon– Helps with the addittion of flour.
- Medium Sized Glass Bowl– The first few days of a starters life is easier done in a medium size glass bowl.
- Plastic Wrap or Reusable Food Wraps– For the first few days of the starters life.
- Glass Jar (see below)
Sourdough Starter Container
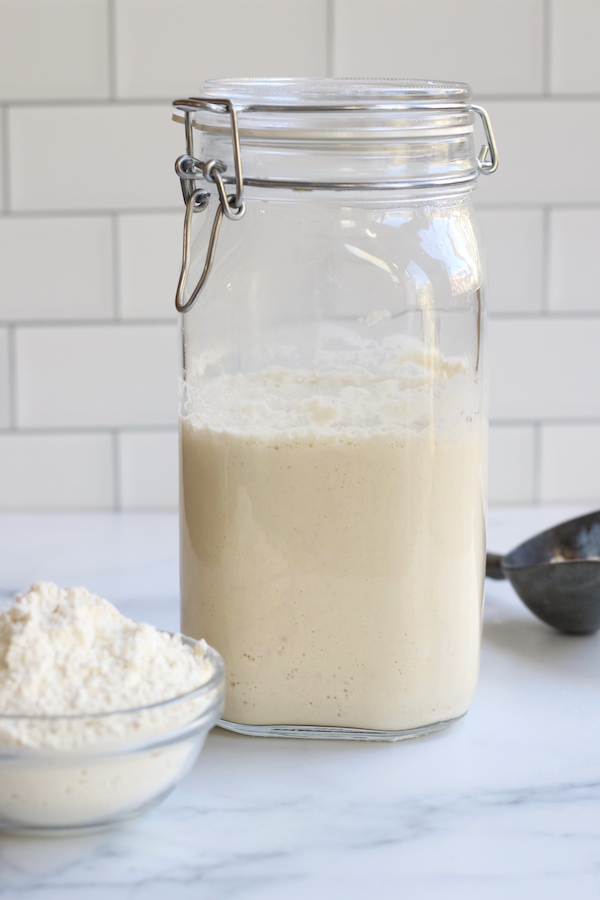
The type of glass jar needed will depend on which type of flour you use to make your starter and how rapidly your starter ferments. This is the jar seen in the photo below and it works beautifully when using white all-purpose flour. Please see section directly below (White Flour vs Wheat Flour) for more explanation.
Best Flour for Sourdough Success
For the best sourdough starter, you need flour you can trust. Buying directly from King Arthur Flour means guaranteed freshness, expert-tested quality, and no risk of warehouse mishandling. Plus, you’ll find exclusive products, better stock availability, and support an employee-owned company dedicated to bakers. Skip the third-party markups and get the best right from the source. You and your sourdough deserve it! (affiliate)
White Flour vs Wheat Flour
The type of flour used will have a great influence on how your Stater ferments and the final product that you make with it. However, it is most important to not choose bleached flour as this will impede the fermentation.
All-Purpose White Flour
I adore sourdough bread that bites me back when I eat it. In other words, extra sour with a tang. However, my husband HATES that kind of bread. That is why I use all-purpose white flour for my Starter.
This type of flour yields breads that are very much like a crusty Italian loaf that he and I both go crazy for. Additionally, I use the Starter from this type of flour for making baguettes that then make incredible Homemade Breadcrumbs and croutons. The final products are never overly sour.
Wheat or Rye Flour
Wheat and rye flour has more naturally occurring wild yeast. Because of this, the starter made from these types of flours will ferment faster and with more intensity. It is very important to keep a closer eye on Starters made from these flours and to use a glass jar that has a lid that is looser or can be left slightly open. The reason for this, a tight fitting lid could be a recipe for an exploding jar.
In conclusion, wheat and rye flours will make much stronger sourdough products and all-purpose white flours (unbleached) will yield more mild final products.
How To Make
To make Sourdough Starter that is ready to bake with will take approximately 7 days, give or take a day or two. Here are the instructions for each day.
Day 1
In a medium sized glass bowl mix together 50 grams of water and 50 grams of flour. Stir well and cover. Let sit at room temperature.
Pro Tip#1– To accurately weigh the flour and water start by making sure the scale is weighing in grams vs ounces. Place the bowl on the scale and turn on. The scale should read zero with the the bowl on top. Add enough flour to equal 50 grams. Calibrate the scale back to zero again and repeat with water.
Pro Tip#2– In the making and feeding of this starter there will always be equal parts of flour and water added to it.
Day 2
To yesterday’s mixture add 50 grams of flour and 50 grams of water. Stir well and cover. Let sit at room temperature.
Day 3
Throw away half of the Starter. To the remaining Starter add 100 grams of flour and 100 grams of water. Stir well and cover. Let sit at room temperature.
Pro Tip#3– The discarded Starter from day 3- day 6 is not fully developed enough to have any uses. Simply throw it away.
Day 4
Throw away half of the starter. Add 150 grams of flour and 150 grams of water to the bowl and stir well. Cover and let sit at room temperature.
Pro Tip#4– Day 4 is the day that you will notice the mixture starting to take on the personality of a Sourdough Starter. There should be small bubbles and a slight sour smell will start to take shape.
Day 5
Similar to the previous days, throw away half of the Starter and add 150 grams of flour and 150 grams of water. Stir well, cover and let sit at room temperature.
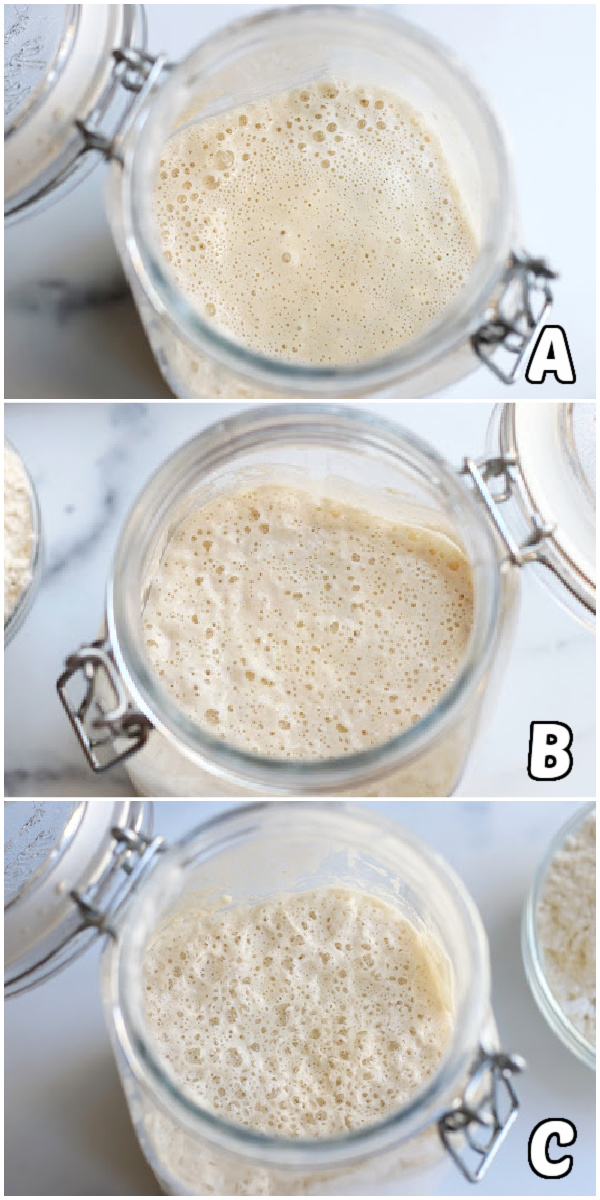
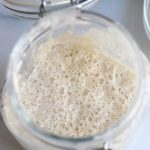
Pro Tip#5– The Starter should begin to look very similar to picture A below. If not do not worry, it will very soon. Also, feel free to transfer to the glass jar once the new flour and water its mixed in on day 5.
Day 6
Throw away half of the starter and add 200 grams of flour and 200 grams of water. Stir well, cover and let sit at room temperature.
Pro Tip#6– By day 6 the Starter should look similar to photo A below and very possibly look like photo B.
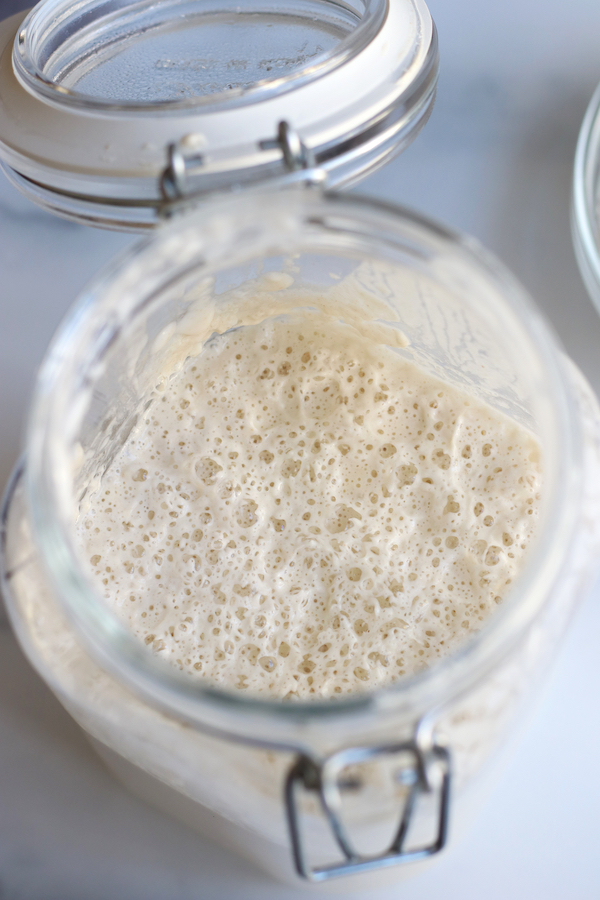
Day 7
On day 7 the Starter should at the least look like photo B if not like photo C. If it has a similar appearance to photo C, it is ready to use. If it looks like photo B, let it sit at room temperature for one additional day.
Feeding and Reviving Sourdough Starter
Above all, if your Starter looks like photo C it is ready to be used for making all kinds of sourdough products. If it looks like photo B, you can still use it for baking. However, it will slow down the rising of bread dough. When it looks like photo A, it is time to feed the Starter.
To feed the Sourdough Starter, discard half of it and add 150 grams of flour and 150 grams of water to the remaining Starter. Stir well and let sit at room temperature overnight. If on the second day the Starter has the appearance of photo B, let it sit at room temperature for one additional day before using it in recipes.
Pro Tip#7– If storing the Starter at room temperature it will need to be fed every 2-3 days. If storing in the refrigerator, it can be kept safely for up to 10 days before feeding. Please note that if storing in the refrigerator 2 feedings will most likely be needed before the Starter will look like photo C.
Starter Smell and How to Know if it has Gone Bad
A healthy Sourdough Starter is going to smell sour. Therefore, it is not the best way to judge whether it has gone bad. However, the best way to know is by its appearance. If there are any visible signs of mold or red/orange spots it is time to throw the Starter out and begin again. Take heart though, Sourdough Starters are full of good bacteria. Because of this, chances of it going bad are much lower.
Maintaining Sourdough Starter
For anyone new to sourdough baking, it is incredibly normal to have many questions and concerns about maintaining your sourdough starter. How To Maintain Sourdough Starter has a complete breakdown of the feeding schedule, common concerns and questions so that you can enjoy your sourdough starter for decades to come.
If you enjoyed this Sourdough Starter please let me know by leaving a comment and review below. Doing so helps to encourage others to make the recipe also. Thank you!
Easy Sourdough Starter
Ingredients
- 700 grams white all-purpose flour *see Note #1 below
- 700 grams filtered water
Instructions
Day 1
- In a medium sized glass bowl mix together 50 grams of water and 50 grams of flour. Stir well and cover. Let sit at room temperature.See Note #2 and Note #3 below.
Day 2
- To yesterday’s mixture add 50 grams of flour and 50 grams of water. Stir well and cover. Let sit at room temperature.
Day 3
- Throw away half of the Starter. To the remaining Starter add 100 grams of flour and 100 grams of water. Stir well and cover. Let sit at room temperature.See Note #3 below.
Day 4
- Throw away half of the starter. Add 150 grams of flour and 150 grams of water to the bowl and stir well. Cover and let sit at room temperature. See Note #4 below.
Day 5
- Similar to the previous days, throw away half of the Starter and add 150 grams of flour and 150 grams of water. Stir well, cover and let sit at room temperature. See Note #5 below.
Day 6
- Throw away half of the starter and add 200 grams of flour and 200 grams of water. Stir well, cover and let sit at room temperature. See Note #6 below.
Day 7
- On day 7 the Starter should at the least look like photo B above if not like photo C. If it has a similar appearance to photo C, it is ready to use. If it looks like photo B, let it sit at room temperature for one additional day.


Mine keeps molding my after the first day 😫
I have unbleached all-purpose flour, filtered water, in a glass container. There’s Saran Wrap on top. This time I put tin foil around it also so there’s not so much light on it. Idk what I’m doing wrong.
Hi Niki. I am so sorry you’re having trouble with your starter. It must feel very frustrating. Let’s see if we can figure this out together!
It might not be mold you’re seeing. Mold typically appears as fuzzy, discolored patches (green, black, pink, etc.). On the other hand, if you’re noticing a grayish liquid on top, that’s called “hooch.” Hooch is a natural byproduct of the fermentation process and is completely normal. You can simply stir it back in.
From what you’re sharing, it sounds like you are following all the steps and being incredibly cautious with cleanliness. Also, mold generally takes longer than a day to appear. I could be wrong, but I suspect that it is hooch you’re seeing.
I hope this helps clarify things! Let me know how it goes, and feel free to ask any more questions. Happy baking! 😊
Nikki I notice you don’t have any direction after the sourghdough starter is to be stored in refrigerator and fed on a weekly basis. Can you provide that information ? It would help if you store and feed it properly the starter last for a long time .
Hi Tess. I am not sure if you are asking Nikki or myself. Here is my detailed post about maintaining the starter that you may find helpful. https://www.thefedupfoodie.com/how-to-maintain-sourdough-starter/
Mine was doing great until day 4, then it started developing hooch after each feeding and no bubbles. 😢 Today is day 7 and I’m wondering if I need to just throw it away and start over? Or do I need to feed it?
Hi Lindsey. I’m sorry to hear about the challenge with your starter. When you see hooch, it’s a sign that your starter is hungry, which is a normal part of the fermentation process. I recommend continuing with the daily steps. After day 7 you may consider doing more frequent feedings or adjusting the feeding ratio if bubbles form. It’s also beneficial to ensure you’re using the right type of water and flour. This post breaks down different options that might impact your starter: https://www.thefedupfoodie.com/how-to-maintain-sourdough-starter/
I hope all turns out well and please feel free to reach out if you have more questions!
I am on day 7 of my starter recipe. Everything is going well. I will be leaving town for 3 days and not using starter or able to feed it for those 3 days. How do I keep what I have worked hard on? Can I store in refrigerator until I’m ready to bake?
Hi Christie. I’m glad to hear your starter is doing well! Yes, you can store your starter in the refrigerator while you’re away or leave it at room temperature. Either way, it will more than likely develop a layer of hooch, a clear liquid that is perfectly normal. When you return home, simply stir in the hooch and proceed with the discard and feeding. This post gives you all the ins and out on what to expect in maintaining your starter. https://www.thefedupfoodie.com/how-to-maintain-sourdough-starter/
This recipe is awesome and easy to understand! When you hit day 7 what happens next? When is it okay to bake and how do you do that? Thank you in advance 🙂
Hi Andrea. I am so happy to hear this. Once you hit day 7 your should be ready to use for baking. You may find this post helpful on how to maintain your starter; https://www.thefedupfoodie.com/how-to-maintain-sourdough-starter/
Also, I have some sourdough bread recipes you may enjoy here; https://www.thefedupfoodie.com/category/meal/breads/sourdough/
How many loaves of sour dough bread does this amount starter make? From what I’ve read it make many but I’m just looking to bake 2-3. It’s my first time so any information would be helpful 🙂
Hi Jasmyn,
Great question! The beauty of a sourdough starter is that it can be maintained indefinitely and used to make an endless supply of bread over its lifetime. For your first time baking, you can definitely make 2 regular sized loaves. You will only use part of the starter, leaving some behind to be fed for future loaves of bread.
You might also find this post helpful: https://www.thefedupfoodie.com/how-to-maintain-sourdough-starter/
Happy baking, and feel free to ask if you have any more questions!
My sourdough starter is on day 8 and I only have a few bubbles and it has stopped rising.
Hi Loren. Thanks for reaching out! It sounds like your starter might need a little boost. Make sure it’s in a warm spot (70-75°F) and try feeding it every 12 hours for a few days. Also, I would recommend making sure the flour is unbleached in addition to the tips I share in this post. https://www.thefedupfoodie.com/how-to-maintain-sourdough-starter/
Happy Baking!
Hello!
Thank you for this step-by-step of the process. I just completed the steps for day 1. When I move onto day 2 and so on, should I be waiting a complete 24 hours before completing those steps?
Hi Taylor. You are very welcome and I am excited for you! Usually 24 hours give or take an hour or two. It doesn’t have to be right on the nose of the 24 hour mark.
I would love to hear how it goes and please don’t hesitate to reach out with any other questions. Happy Baking!
hello, why does my starter keep having hooch? Im on day 6 but it started since day 3. Is this normal? Am I doing something wrong?
Hi Lupe! Hooch on your sourdough starter is normal and usually means it’s hungry. Stir it back in and try feeding your starter more frequently, about every 12 hours. It might also need a few extra days of feeding. You may find this post helpful in keeping your starter healthy. https://www.thefedupfoodie.com/how-to-maintain-sourdough-starter/ Keep going—you’re doing great!
I’m on day 7 for my starter, and it’s looking more like photo A, but its starting to smell more like bread. I did have some water on top on day 5 and a little on day 6 so I did back off on the water a bit on those days. any recommendations? I typically feed in the early evening. do I skip the feeding tonight and just leave it out at room temp? Should I put it in the oven with just the light on? Any thoughts are much appreciated!
Hi Adrienne. It sounds like your starter is progressing nicely! It’s great that it’s starting to smell more like bread. The water on top, called hooch, is completely normal and just a sign that your starter is hungry. I recommend stirring it back in and proceeding with the discard and feeding process.
It sounds like your starter may need just a few more days (2-3 days) before it’s ready to use for bread. For now, discard half of the starter and then feed it with 150 grams each of water and flour for the next few days and then you should be good to go. Don’t hesitate to reach out if you have any other questions that may pop up and you may find this article helpful also. https://www.thefedupfoodie.com/how-to-maintain-sourdough-starter/
Happy Baking!
Hi! This blog post is so helpful! I have been following for 5 days but my starter is on day 7. I’ve been feeding my starter every 12 hours so it sped up the process cause it’s been very hot in my house (no ac :’). But all the tips have been super helpful. Can you tell me how much we should be feeding our starters once we are ready to put in the fridge for a while? Is there a limit on how long the starter should be in the fridge for? Have you tried dehydrating the your starter? Would it still work same day of dehydrated? Sorry for all the questions! Any advice or tips would be helpful!
Hi Alexa! Thank you so much for your kind words! I’m thrilled to hear that you’ve found the blog post helpful, and it’s great to know that the tips have been working well for you. 😊
I recommend feeding your starter 150 grams of both water and flour daily until it is ready to bake bread. In between baking, it can definitely be stored in the refrigerator; however, I often keep mine on the kitchen countertop for 3-4 weeks at a time without feeding it. When I am ready to bake, it usually takes about 3-5 days of feeding, depending on how long it has been inactive.
As for dehydrating, I haven’t tried this approach myself. For me, it would just be an extra step.
No need to apologize for the questions—I’m here to help! If you have any more questions or need further advice, feel free to ask. Also, you may find this article helpful in maintaining your starter: https://www.thefedupfoodie.com/how-to-maintain-sourdough-starter/
Happy baking!
After it’s ready and say you use most of it. how do you know how much to feed it? because some days it was 50g, 100g 150g and 200g. how do I know which amount to feed it? thank you so much for this easy step by step!!!
Thank you so much for your kind words! I’m glad you found the step-by-step guide helpful. 😊
Once your starter is ready and you’ve used most of it, you’ll typically have about half of the starter remaining. From this point, you can establish a consistent feeding routine. I recommend feeding your starter with 150 grams of both water and flour moving forward. Ho often you feed it will depend on how often you will be baking.
For more detailed instructions on maintaining your sourdough starter, please check out my post: https://www.thefedupfoodie.com/how-to-maintain-sourdough-starter/
I hope this helps and please don’t hesitate to reach out with any additional questions. Happy baking!
I’ve tried this recipe twice now. First time it was growing at all and the consistency was water. As a first time starter, I wasnt sure if it was a loss so I threw it out and started again. This time I am on day 10 and my starter is still not growing. It’s still liquidy. I am at a loss.
Hi Lauren. I apologize for the delayed response. It sounds like you’re running into some frustrating issues, but let’s see if we can figure out what is possibly preventing the starter from growing. The liquidy consistency and lack of growth could be due to the type of flour or the water being using. Here are a few things to consider:
Flour: Make sure you’re using unbleached all purpose flour. Also, whole grain or whole wheat flour can be used for the initial days of your starter. These flours have more nutrients that wild yeast love, which can help your starter grow.
Water: If you’re using tap water, try switching to filtered or bottled water. Tap water can sometimes contain chlorine or other chemicals that inhibit yeast growth.
Environment: Sourdough starters thrive in a warm environment (around 70-75°F or 21-24°C). If your kitchen is cooler, that could slow down the process. You might want to keep it in a warmer spot.
Don’t give up! Sourdough starters can be a bit finicky, but once you get it going, it’s so worth it. If you’re still having trouble, feel free to reach out—I’m happy to help troubleshoot further!
I have been following this recipe and I’m on day 6. My starter has bubbles, not as many as yours but it only rises about half an inch everyday. How much should it be rising everyday? Other recipes I have followed have said it should double in size but this recipe has much more starter than others.
Hi Brooke. Thanks for your patience! It sounds like your starter is progressing nicely. Ideally, you’ll want it to double in size, but new starters often take a bit longer to reach that point. Based on what you’ve shared, it seems like you might need just 2-3 more days of feeding before it’s ready to bake with. Keep nurturing it, and you’ll be baking bread in no time!
Thank you so much for the easy to read and understand the step by step process!! I am a first time maker of sourdough starter and your recipe is the easiest that I have found to follow. I will be looking into your post on how to store the starter!! Thank you again and keep sharing your wisdom!
You have made my day!!! Thank you so much Sam!
How do you know how much is “half” to discard? Are you weighing it and discarding half of the weight?
Hi Nadini. It is by sight. It doesn’t have to be a perfect half discard, just an approximate amount. If you’re more comfortable with precision, you can certainly weigh it, but eyeballing works just fine for this recipe!
I started my sourdough starter with 100g of water and flour each. Is it okay to add 50g for day 2 and follow your instructions for every day after or do I need to double the amounts you have listed?
Hi Victoria! Starting with 100g of water and flour is absolutely fine. On day 2, you can go ahead and add 50g each of water and flour, then continue following my instructions as usual. No need to double the amounts—your starter will still flourish. You might just need an extra day or two of feeding and discarding before it’s ready to use.
So today is day 6 and my starter has gone crazy and over flown from the mason jar – just glad I didn’t screw the lid down tight – the overflow is captured in a bowl – is my starter still useable or do I need to go back to day 1 ?
This is such a good question! It sounds like your starter is incredibly healthy and full of life—just what you want to see. The overflow is a sign that it’s thriving, and there’s no need to go back to day 1. In fact, your starter is more than ready to make some delicious sourdough bread. Just be sure to transfer it to a larger jar or bowl when you feed it next to give it plenty of room to expand. Happy baking!
Very easy to follow and understand instructions. Thank you!
That makes me so happy to hear! You are very welcome and thank you Leanna for giving the recipe a try.
OMG i wish I could post pictures in your comments – I’ve tried to grow a sourdough starter several times without success but with this recipe i’ve not only kept it going for 7 days but today I baked my very first sourdough sandwich loaf, baguette and some rolls – they look and taste amazing so thank you for your amazing recipe and detailed instructions x