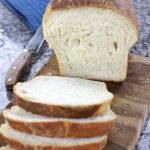
Soft Sourdough Bread
Soft Sourdough Bread makes perfect sandwich slices that are fluffy and light. With the Easy Sourdough Starter and just a few ingredients, this recipe simplifies the basics, making it incredibly easy for beginning sourdough bakers. Want a roll version? Try the Sourdough Cloverleaf Rolls!
Servings 2 Loaves (each loaf is 2 pounds)
Ingredients
- 300 grams Easy Sourdough Starter *bubbly and active
- 50 grams sugar *or honey, *see Note #1 below
- 650 grams warm water *105°F to 115°F (40°C to 46°C)
- 1000 grams all purpose flour *unbleached
- 25 grams salt
- 40 grams oil *I use either avocado or extra virgin olive oil
Instructions
Mixing the Dough
- Weigh and combine the sourdough starter, sugar and warm water in a large bowl. Mix together until the starter dissolves.Note: Remember to tare your scale before weighing your ingredients.
- Add in the flour and salt and mix it in with your hand or a wooden spoon.
- Once the flour is mostly incorporated, add the oil and mix until everything comes together into a rough, shaggy dough. Cover the bowl with an oiled piece of plastic wrap and let the dough rest at room temperature for approximately 45 minutes.
Stretch and Fold
- After resting, gently pinch one side of the dough, stretch it upwards and then fold it onto the center of the bowl. Repeat this process for approximately 1 minute, working around the perimeter of the bowl. Cover the bowl and let the dough rest for another 30 minutes.
- Repeat this process of stretching, folding and resting a total of 4 times.
Bulk Fermentation (First Fermentation)
- Once the final stretch and fold is completed, let the dough rest either at room temperature or in the refrigerator to complete the first fermentation. It will take approximately 4 hours at room temperature or 12 hours in refrigeration to proof. See Note #2 below.
Shaping the Dough
- Note: When fermenting the dough in the refrigerator, be sure to remove it and let it come to room temperature before shaping. This step ensures easier handling of the dough and ultimately leads to superior results.
- Grease two standard size loaf pans (approximately 8.5 x 4.5-inch or a 9 x 5-inch pans) and set aside.
- Turn the proofed dough onto a lightly floured flat surface.
- Gently pinch the edge of the dough, then pull and fold it into the center a few times to firm up the dough before evenly dividing it in half.
- Carefully flatten the first half into a rectangle shape. Starting with the edge closest to you, roll the dough tightly away from you, creating a cylinder.
- Place the prepared dough into a greased loaf pan with the seam side down. Repeat with the second half of the dough. Cover with oiled plastic wrap and let proof (second fermentation) at room temperature for approximately 1-4 hours. See Note #3 below.
Baking the Loaves
- Within the last half hour of the second and final rise, preheat the oven to 375℉. See Note #4 below.
- Once the loaves have fully risen, remove the plastic wrap and score the tops by making a slash along the length of the loaves with a sharp knife or lame. See Note #5 below.
- Bake the loaves in the preheated oven for 35-40 minutes, or until they are golden brown and sound hollow when tapped on the top.
- Remove the loaves from the oven and let them cool in the pans for 10 minutes before transferring them to a wire rack to cool completely. Note: Do not store until the loaves are completely cool.
Notes
Notes
Note #1- If you like your bread just a little less sweet, use 30-35 grams of sugar rather than the full 50 grams. Doing this may slow the fermentation down slightly and there may be less pronounced caramelization in the crust.
Note #2-If you're short on time, opt for the convenience of doing the first fermentation in the refrigerator and then baking the next day. This method slows down the process, giving you more flexibility with your schedule. For instance, you can prepare the dough on a Saturday, let it ferment in the refrigerator overnight, and then shape, perform the second fermentation, and bake it on Sunday.
Note #3- Keep an eye on the dough during the proofing process. The time needed for proofing can vary depending on factors such as room temperature and how vibrant the starter was. Look for visual cues such as increased volume and a slight jiggle when gently shaken to determine when the dough is adequately proofed. Also, a poke test can be used by lightly pressing your fingertip into the dough. If the indentation springs back slowly and leaves a slight impression, it's ready to bake. If it springs back quickly, it needs more time to proof. If it collapses or doesn't spring back at all, it may have over-proofed.
Note #4- A well preheated oven is crucial for achieving optimal oven spring because it ensures that the bread dough begins baking at the correct temperature. The sudden burst of heat from the preheated oven triggers rapid expansion of the dough, leading to increased volume and a lighter texture in the finished loaf. In other words, preheating for 30 minutes yields superior results.
Note #5- Because Soft Sourdough Bread has a high hydration level, scoring the dough can be a bit tricky for beginners. Here are some tips to help you achieve clean and effective scoring:
- Use a very sharp knife, lame or razor blade. This will help to create clean cuts.
- Hold the blade at a shallow angle (about 30-45 degrees) to the surface of the dough. This helps the cuts open up properly during baking.
- Make confident, swift cuts across the surface of the dough. Avoid hesitating or sawing motions, as this can drag the dough and lead to irregular cuts.